Fifth Wheel Running Gear · Complete Owner Documentation · 2nd Edition
The 17.5″ Conversion:
Commercial Wheels on 7K Trailer Axles
A complete DIY map — every spec, part number, dead end, technique, and trap from a real conversion on a 2021 Alliance Paradigm 370FB (Dexter 7,000 lb axles, drum brakes retained). Written for owners who don’t know what a knurl is yet, by one who learned every lesson the verified way. If ST tire blowouts keep you up at night, this is the cure, documented.
Applies broadly to trailers on Dexter 7K axles / #42 spindles · Verify every dimension against YOUR axle before ordering · No vendor affiliation01Why Do This02Lug-Centric vs. Hub-Piloted03Your Starting Point04The Wheels05The Hubs06The Stud Problem07Nuts & Center Caps08Bench Work: Studs & Grease09Installation Day10Mounting & Torque11Tire Pressure by the Table12The Spare Question13Complete Bill of Materials14Life After: Ride, Weight, Care15The Meta-Lesson
Why Do This At All
The most common running-gear failure on heavy fifth wheels is the ST tire blowout — a hot, overworked “Special Trailer” tire letting go at highway speed, taking fender skirts, underbelly, and sometimes wiring with it. Factory tires on many 16,000+ lb rigs run near their rated capacity every mile.
The community’s proven fix: 17.5″ commercial wheels and tires. An H-rated 17.5 commercial tire (Goodyear G114, Sailun S637, and peers) carries ~4,805 lbs per tire at max pressure — on a typical tandem rig it loafs at 60–70% capacity where the factory tire strained near 100%. All-steel construction, 75 mph speed ratings, heat tolerance built for regional trucking. Trailer manufacturers themselves now ship heavier models with 17.5s from the factory — this conversion retrofits that fix.
Most documented paths cost $3,000–6,000: turnkey mounted packages (~$2,200 without hubs or install) or full 8K-axle/disc-brake conversions. This guide documents the budget path nobody has written up: keep your 7K axles and drum brakes, convert only the wheel ends. Hardware and hubs run ~$1,100–1,300; used wheel/tire packages (owners upgrading to disc setups sell takeoffs) can halve the wheel side; selling your factory 16″ set recovers hundreds more. Done carefully, the conversion can approach break-even.
The Concept That Decides Everything
Before any part numbers, understand this distinction — every trap in this project traces back to it.
Lug-centric (your factory setup): The wheel has cone-shaped (beveled) lug holes. Cone-seat nuts wedge into the bevels and the cones center the wheel. The hub’s center area does nothing — it’s usually rough, unmachined casting.
Hub-piloted (the 17.5 commercial system): The wheel has flat lug holes — no bevels. The wheel’s center bore slides over a machined ring on the hub (the pilot), which locates and centers the wheel. Flat-faced flange nuts clamp it; they provide zero centering. This is how every semi, bus, and commercial truck wheel in North America mounts — the joint is carried by friction across the clamped faces, and the nuts supply the squeeze.
Trap #1 — You cannot mix the systems
Cone nuts on flat holes have nothing to seat into. Flange nuts on a wheel with no machined pilot clamp the wheel wherever it happens to sit — potentially off-center: vibration, uneven stud stress. Flat-holed wheels require a machined-pilot hub and flange nuts. No partial credit.
The design mostly protects you — at the bench, not the catalog
A reassuring pattern runs through this entire parts ecosystem: it is engineered to resist incorrect assembly. Wrong-pattern wheels won’t meet the hub. A screw-in stud can’t retain in a smooth broached hole. A stud head can’t pass through a hole smaller than itself. An oversized pilot won’t enter the bore; cone nuts find nothing to seat against on flat holes; an undersized knurl announces itself under torque. Forcing a mismatch is possible with enough determination, but the system is shaped so that correct parts practically self-align and incorrect ones mostly refuse to go together. The consequence for how you spend your vigilance: nearly every trap in this guide is a purchasing trap, not an assembly trap. The dangerous moments happen at the catalog and the parts counter — where a plausible part number, a mis-measured pilot, or a lookalike stud can be bought in good faith. Verify at the point of purchase (published specs, manufacturer tech lines, the bench-fit test) and the wrench work that follows is the easy, satisfying part the design intends it to be.
Know what your parts counter can — and can’t — tell you
A caveat to set expectations, offered with respect for the people behind the counter: this conversion combines commercial-truck practice with trailer parts, and that combination sits outside the daily traffic of most RV and trailer counters. Counter staff are capable generalists covering thousands of parts across every trailer ever made — but hub-piloted mounting, knurl specifications, swivel-versus-solid flange nuts, and machined pilot diameters are specialist details that even good, well-intentioned counters may not know cold. During this build, honest counters offered hand-caliper measurements that swung 0.07″ from the true dimension, described this common commercial setup as unusual, and stocked only solid flange nuts for an aluminum-wheel application — none of it negligence, all of it simply outside their normal lane. The working rule: treat counter answers as helpful starting points, and treat manufacturer sources as the authority. The axle and component makers’ tech lines (Dexter: 574-295-7888), published spec sheets, and your own bench-fit test are where dimensional questions get settled. When a counter’s answer includes “as near as I can measure,” “should be,” or “we don’t normally see this” — that’s your cue to make the phone call, not a reason to distrust the counter generally. The old-line heavy-duty and commercial truck parts houses are the frequent exception: hub-piloted hardware is their daily bread, and they’re worth seeking out for exactly these components.
Your Starting Point
On a Dexter 7,000 lb axle (standard on many heavy fifth wheels), the factory wheel end:
Spindle#42 tapered
Inner bearing25580 (1.750″ journal)
Outer bearing14125A (1.250″ journal)
Grease seal010-036-00 (2.25″ ID)
Brakes12″ × 2″ electric drum
Bolt pattern8 on 6.5″
Factory studs1/2″ or 9/16″, lug-centric hubs
Factory wheels16″ lug-centric, cone nuts
The good news buried in that table: bearings, seals, spindles, and brakes all carry over. This conversion replaces hub/drums, studs, nuts, wheels, and tires. The axle never changes — and neither do its ratings. The new bearings in replacement hubs are the same 25580/14125A; your spares serve both eras.
Trap #2 — Verify your own axle first
Don’t trust forum posts (or this guide) for your axle’s as-built spec. Every Dexter axle has a serial-number sticker on the tube. Call Dexter — 574-295-7888 — and they’ll confirm your spindle, bearings, seal, and brake configuration as manufactured. One call anchors every purchase. (Seal history note: the 2.125″ seal journal disappeared from production in the 1990s; modern axles are 2.25″. Confirm anyway.)
The Wheels
You need 17.5″ wheels in 8 on 6.5″ bolt pattern, hub-piloted, ~4.75–4.77″ center bore. Forged Alcoas are the benchmark — the Alcoa 661401 (17.5×6.75) spec sheet reads: 8×6.5, 4.77″ hub bore, hub-piloted with two-piece flange nuts, 0.68″ bolt holes, 30 lbs, 6,050 lbs per wheel — the highest load rating of any forged wheel its size. Trailer parts houses also sell equivalent forged wheels packaged with matched hardware.
Trap #3 — The commercial 17.5 that will never fit
17.5″ wheels also exist in 8×275mm pattern with a ~221mm (8.7″) bore — the lowboy/semi pattern. No hub adapts these to your axle, ever. Before buying: bolt circle measured center-to-center across opposing holes must read 6.5″; center bore ~4.75″, not almost nine inches. Any listing saying 275mm, 221mm, or “ISO dual-mounting” is the wrong wheel at any price.
- Verify three numbers on any wheel: bolt circle (6.5″), center bore (4.75–4.77″), lug holes flat (not beveled) and clearing your stud diameter
- Bore slightly over pilot is correct — hub-piloted is a clearance fit; the commercial standard runs ~0.040″ total clearance. The wheel rests on the pilot; the clamped joint does the rest
- Used takeoffs are the value play — owners doing disc/8K conversions sell exactly these. Check date codes (last 4 of the DOT: week-week-year-year); tires age from that date even in perfect storage. Price accordingly and plan replacement 5–7 years from the code
- Forged handles tandem scrub — tight-turn lateral loads are the aluminum-wheel concern people raise; forged one-piece construction (no welds, aligned grain) is the construction class that runs under commercial tandems for millions of miles. Cast aluminum is where scrub reputations come from
The Hubs
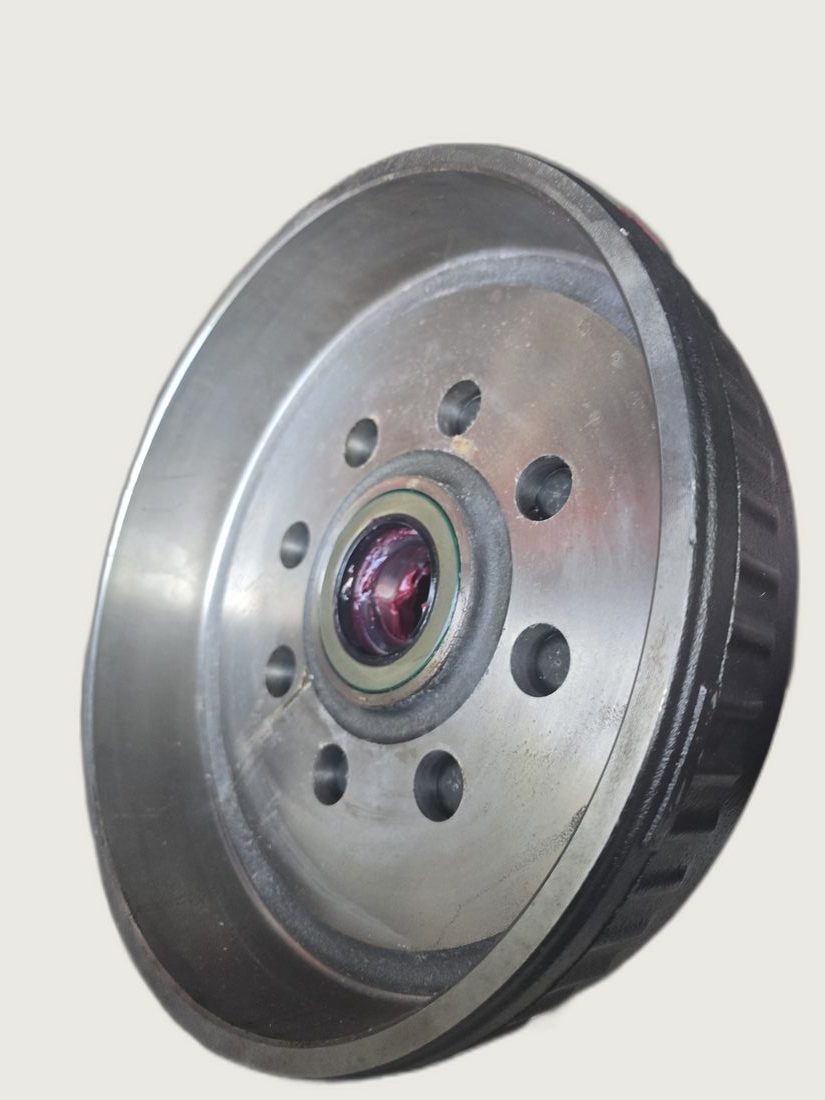
Factory lug-centric hubs cannot be reused — unmachined pilot, and stud holes broached for smaller studs (drilling them out destroys the broaching your new studs need). You need new 7K hub/drum assemblies with a machined pilot:
| Part | Number | Notes |
|---|---|---|
| Dexter pre-greased hub/drum kit (used in this build) | K08-219-2G (hub/drum: 008-219-13) | 12×2 drum, 8-6.5, bearings packed, races factory-seated, 2.25″ seal, E-Z Lube cap, spindle hardware. ≈$180–200 ea. street |
| Dexter à la carte, E-Z Lube | K08-219-9C | Same hub, no kit contents, higher price — the 2G kit is cheaper AND better assembled |
| Aftermarket (TruRyde, Lippert) | 42865LB3E-916 family | $105–160; Timken-bearing version is the budget value pick |
Trap #4 — “As near as I can measure” is not a spec
The pilot diameter is the make-or-break dimension, and counter staff measuring an assembled hub with hand calipers will swing 0.07″ either way — enough to wrongly kill or approve the part. In this build one counter read 4.68″; Dexter’s own tech measured the same hub at 4.73″ on a machined (cast-then-cut) pilot — a correct clearance fit under a 4.77″-bore wheel. Get the dimension from the manufacturer’s published spec or tech line, and confirm the word machined. Cast-only pilot = wrong hub regardless of measurement.
The bench test that ends all debate
Before anything touches the trailer, set one wheel over the new hub’s pilot. Correct fit slides on and seats with a whisker of play. Loose flop or won’t-seat = hub goes back. Buying locally makes this test possible before money changes hands — worth a modest premium over mail order by itself.
The Stud Problem — Where Everyone Gets Stuck
This section exists nowhere else, and it’s where the project nearly dies. Read it twice.
Thick forged aluminum pads (~0.8–1″) eat stud length. The studs in your new 9/16-stud hubs — Dexter 007-132-00, ~2.3″ long — will engage a tall flange nut through an Alcoa pad with little or nothing to spare. Most builds need ~half an inch more stud.
The gating vocabulary: press-in studs retain by a knurl — a serrated section biting into a precisely broached hole. Replacement knurl must equal or slightly exceed the hole spec, never undersize — an undersized knurl presses in easily, feels fine, then spins under torque or loosens at speed. Dexter’s published knurl spec for these hubs: 0.689″. (Measured serrations caliper a thou or two under nominal — 0.686″ measured on a 0.689″ stud is expected.)
Trap #5 — The long 9/16 stud you want does not exist
Search every catalog: there is no standard press-in 9/16″-18 stud longer than ~2-5/16″ with the 0.689″ knurl. Longer 9/16s that exist have wrong knurls (0.620″, 0.680″ — automotive specs, undersized: reject) or are screw-in studs (Dexter 025-011-00, 3.06″) for tapped-hole hub families — cannot retain in smooth broached holes. Press-in and screw-in look nearly identical in catalog photos. Read the retention style, not the picture. Note also: a stud cannot be pulled out forward by its own threads — the head won’t pass through the hole. Anyone describing a thread-based “draw-out” removal is mistaken.
The Solution: Step Up to 5/8″
The industry’s answer to “longer stud, 0.689 knurl” is a bigger thread — the same hardware Dexter runs on their own 8K hub-piloted axles:
| Part | Number | Spec |
|---|---|---|
| Lippert stud, single | 175705 | 5/8″-18 thread · 0.689″ knurl · 2-3/4″ shoulder · press-in ≈$4–5 each; buy 35+ (32 + spares — and count the bag against the receipt; short counts happen) |
| Lippert 4-pack | 2024055283 | |
| Lippert 10-pack | 2025027415 |
Three gates before committing: (1) wheel lug holes must clear the 0.625″ stud — Alcoa’s 0.68″ holes do, but caliper yours; (2) press one stock stud out and caliper its knurl — ~0.686–0.689″ confirms the hole spec matches; (3) bench-verify final engagement with a real nut at real torque before pressing all 32.
Nuts & Center Caps
Trap #6 — Solid flange nuts destroy aluminum wheels slowly
The correct nut is the two-piece swiveling flange nut: a captive washer stays planted on the aluminum pad while only the nut body turns against it. A solid one-piece flange nut drags its face across the soft aluminum — galling the pad, producing false torque readings (face friction masquerading as clamp load), losing tension as the galled surface settles. That’s how “properly torqued” wheels loosen at 2,000 miles. Counters will offer solid nuts because they’re in the drawer. Decline.
| Part | Number | Notes |
|---|---|---|
| Two-piece swivel flange nut, 5/8″-18 | 006-209-00 (Rockwell #6-209 / 568216 / AME 39946) | The industry-standard number; Rockwell, AME, Hydrastar, PTFE-coated equivalents all cross to it. $2–6 ea. depending on brand/source; buy 33–34. Stocked by trailer parts houses and commercial truck counters (semi-fleet suppliers sell these as wear items) |
What good nuts look like on arrival
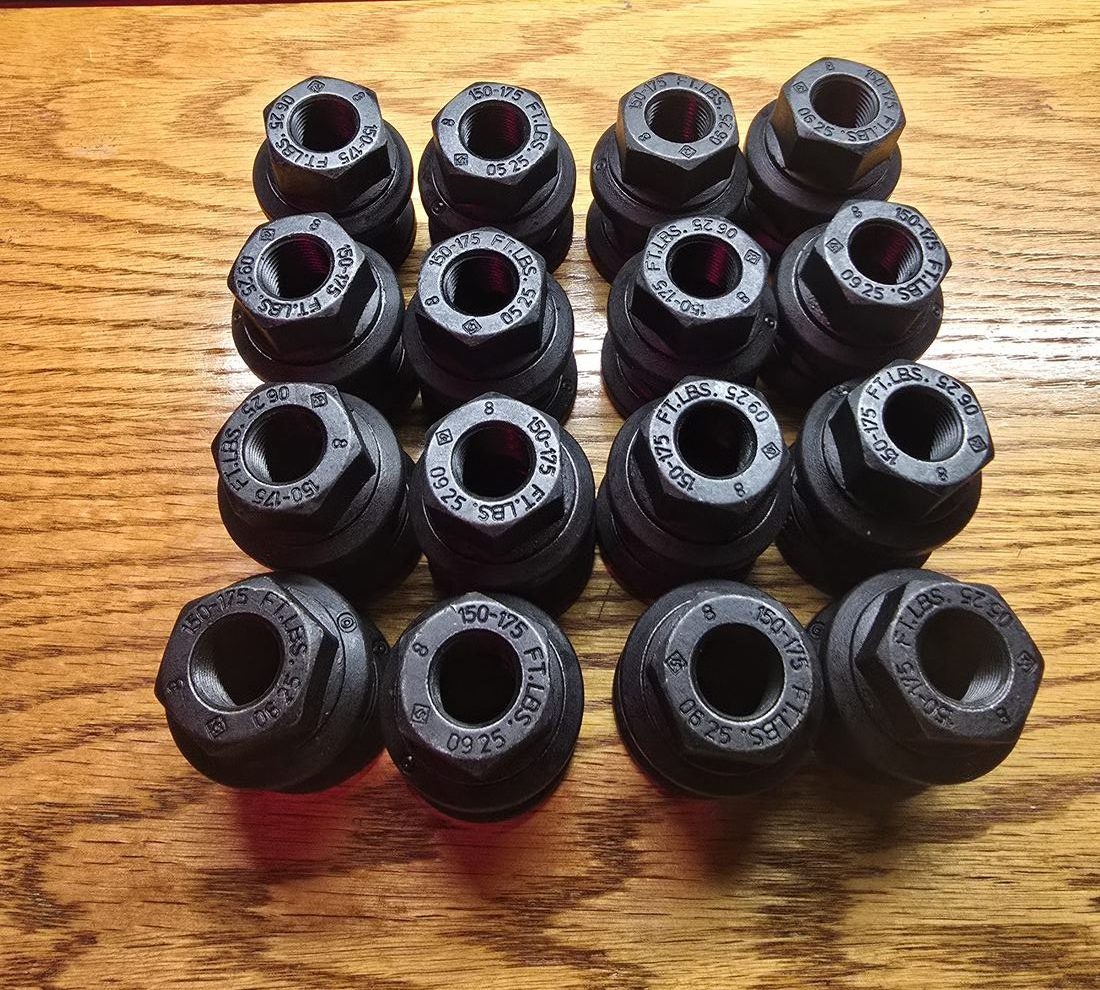
Quality current-production 5/8 swivel flange nuts arrive Grade 8 marked, date/lot coded, and — usefully — stamped “150–175 FT.LBS.” right on the nut face: the manufacturer engraving the Dexter torque spec onto the fastener itself, so every future tire shop reads the number on the part they’re wrenching. Receiving checks: count against the invoice (short counts happen — this build ate one), spin a sample of washers to confirm free, independent rotation, and run a fingertip across the washer faces for the raised capture rim if your center caps mount by washer capture. A bonus of the shared nut-body envelope across the 9/16 and 5/8 versions: lug nut covers and decorative caps sized for the 9/16 hardware often fit the 5/8 nuts identically — the external dimensions carry over; only the thread bore grows. Verify with your own covers at the bench fit before buying replacements.
Center Caps — The Forgotten Casualty
Trap #7 — Your caps were spec’d for hardware you just replaced
Covers molded for the old cone nuts won’t swallow bigger, taller 5/8 swivel nuts, and proud stud tips eat remaining pocket depth. Tall E-Z Lube grease caps can also protrude into cap interiors. Buy caps only after bench-fitting: measure real nut height, stud protrusion, and grease-cap protrusion. Never trim or force old covers — a cover departing at 65 mph is someone’s windshield.
The cap styles that work, decoded:
- Washer-captured caps (elegant, commercial): some swivel-nut washers have a raised outer rim that hooks over a narrow (~1/16″) brim on the cap’s base — the clamp load runs washer-to-wheel while the raised rims capture the cap. If your nuts have the rimmed washers, this matched system installs with the nuts, at torque, and is retained by the most reliable fasteners on the trailer. Verify: all washers engaged over the brim, cap immobile to a firm shove, cap present during every torque event thereafter
- Individual press-on nut covers + bore cap: the commercial-truck look; cheap, deep, indifferent to stud protrusion, and torque checks stay easy
- Bare hardware: the working-truck aesthetic — and a five-second visual torque check at every fuel stop
Bench Work: Studs, Bearings, Grease
Everything in this section happens at home, at leisure, before the trailer is ever lifted. Field sessions become pure installation.
Stud Removal (out the back — the only direction possible)
- The head is larger than the hole; studs exit rearward into the drum cavity, driven from the threaded tip. Methods: shop press (flange solidly supported — load path through the flange, not the drum edge or bearing bore); C-frame/ball-joint stud tool (rentable; best for assembled hubs — no impact near packed bearings); hammer with flange supported on blocks and an old nut flush protecting the tip. Straight exits only — a cocked stud can egg the hole your new knurl depends on.
Stud Installation — Press or Pull-Through Only, Never Hammered In
- New stud enters nose-first from the back; the knurl must engage its hole square.The drop-in is your alignment gauge:the stud’s smooth shoulder should fall freely into the hole under its own weight until the knurl’s leading edge meets the broaching — gently rotate and wiggle the stud until it settles that last bit and sits square on its own. That free drop confirms the stud has found the hole’s true axis.Do not press a stud that hasn’t dropped and settled:a stud pressed slightly cocked or off-center can shave the hub’s broaching or its own knurl on the way in — and the insidious part is that it still presses home and looks correct, with a compromised grip that only reveals itself under torque or miles later. The extra five seconds of settling per stud is the difference between 32 bites and 32 gambles.
- Shop press method with the sacrificial-stud trick:stack one of your removed old studs head-to-head atop the new stud and let the ram bear on theoldstud’s scrap threads. The new stud’s threads are never touched, and the head-to-head contact acts as a slight pivot letting the new stud self-align into the hole’s true axis during the initial bite. A removed stud’s finest hour.
- Pull-through method (no press needed):deep socket or washer stack over the threads on the front, sacrificial nut drawn down with a wrench or impact in short bursts — the stud pulls forward until seated. Oil the nut face and stack, never the knurl’s hole.
- Verify every head dead flush against the back of the flange— fingertip or straightedge lap across all 32. Any gap settles later and costs clamp load.
- Knurl pressing shaves fine chips: keep the hub’s shipping bore plugs in (or a rag over open bores) while pressing, wipe flanges clean after, and spot-check one outer bearing for strays.
Grease Doctrine
- Spec: lithium-complex, NLGI #2, GC-LB rated — matches Dexter’s factory pack (the red grease). Never mix thickener families; everything added stays lithium-complex. Lucas Red “N” Tacky is the shelf-standard match; a 1 lb tub outlasts years of trailer service. No moly — moly’s solid lubricants serve sliding contacts (pins, ball joints), not rolling elements; bearing makers spec plain GC-LB for wheel ends
- Factory pre-greased packs are often acceptable — inspect and decide. Pull one outer bearing (behind the cap, no seal sacrifice) and judge the penetration. Good pack = keep it and save four teardowns. Repacking anyway = a $20 cone-type bearing packer does in seconds what palm-packing does in cramping minutes
- Do NOT fill the hub cavity. Bearings fully packed; cavity walls lightly coated; cavity itself no more than ~1/3 full. The empty space is engineering — expansion relief and pressure headroom protecting the rear seal. Overpacking runs hotter and hunts for the seal lip as an exit
- Partial charge in the dust cap (a third to half): protects the outer bearing face, keeps the spindle nut/threads from corroding, reduces condensation volume. Old-school habit, triple-justified
- Ignore or plug the E-Z Lube zerk. For a hand-packer it’s a failure vector with no function — pumped grease’s path of least resistance is the rear seal, and blown seals grease brake shoes (shoes are then replacement-only; solvent drives grease INTO lining). If plugging: standard thread plug + sealant, two minutes with hubs on the bench. Either way, note “hand-packed — do not use zerks” in your documentation
- Grease stays put by design — the thickener matrix retains oil and releases it microscopically; running bearings hold their working charge for years. Service triggers are time (oil bleed — repack every couple seasons), heat events, or contamination — never “it worked its way out”
- Contamination discipline: packed bearings get bagged (zip-top, air out) if they wait; bearings stay married to their races and their hub; tub lid stays on; work from a dollop, never back-wipe into the tub
Drum Prep
New drums need the friction face cleaned before first use — shipping preservative, handling residue, and (yes, even from premium brands) stray factory grease. Brake parts cleaner only — dissolves and evaporates residue-free. Flood, drain away from the hub cavity, wipe with clean paper towels, repeat until a fresh white towel comes away clean. No carb cleaner, no soapy water on the friction face, and never “it’ll burn off” — heat glazes contamination into the shoes permanently.
Installation Day
With hubs fully built at home, each corner is ~45–60 minutes of pure installation. No driveway? A borrowed flat lot works — with discipline.
Field Doctrine (parking-lot conversions)
- Flat, paved, permitted. Ask the property owner; a yes you can rely on beats a stealth session interrupted mid-corner. Plywood pads under every jack and stand foot — summer asphalt swallows small bases
- One axle per session, never mixed across an axle. Your 17.5 assembly is ~an inch shorter than the ST-235/85R16 it replaces. Front-to-rear height differences the equalizer absorbs as normal articulation; side-to-side across one axle tilts it and loads the pair unevenly. Convert both ends of one axle per session — the rig leaves every session roadworthy, and the mixed transition week (moderate speeds, each tire set at its own correct pressure) is a non-event
- Support stack: chocks both directions first; bottle jack (8-ton is ample — check its collapsed height fits under the laden axle beforehand) lifts under the axle tube near the spring seat — never U-bolts, plate edges, spindle, or backing plate; frame-rated stand under the frame rail or adjacent tube takes the hold; jack backs off to just-kissing as backup. Tandem bonus: lifting one axle transfers load to its partner via the equalizer — the lift is inches. Leveling jacks stabilize only, carry nothing
The Corner Procedure
- Break all eight old nuts loose on the ground— the planted tire resists breakaway torque; crack all eight before lifting so any seized surprise appears while the trailer is still whole.
- Lift, stand, pull wheel and old hub. Inspect the spindle: bearing journals clean, seal journal unscored. (Corner one confirms your seal size for the set.)
- Slide the built hub on; feed the outer bearing, washer, spindle nut.
- Bearing adjustment is preload, not torque:tighten the spindle nut to ~50 ft-lbswhile spinning the hubto seat the bearings → back the nut fully off → retighten finger-tight only → back off to the first retainer position — always back off to a slot, never tighten forward to one. Target: free spin, no roughness, just-perceptible end play (~.001–.010″). Too tight cooks bearings; too loose hammers them.
- Charge and tap the dust cap. Adjust the brake to the new drum (slight drag, back off) — new shoes-to-fresh-drum starts weak until adjusted, and re-adjust after bedding miles.
- Wheel onto the pilot; proceed to torque (next section).
Wake-the-brakes checklist (first tow after any storage or new drums)
Manual-lever each brake and listen for magnet actuation; inspect wiring entries for chafe/corrosion while wheels are off; test the breakaway switch and replace its battery if it’s sat — the legally required system nobody checks. Expect braking to improve over the first ~100 miles as shoes bed to fresh drums.
Mounting & Torque — Verified Numbers
The swivel washer reduces friction, which lowers the required torque — published Dexter data, not forum lore (and it corrected a plausible-sounding wrong number during this build’s research):
| Fastener | Dexter spec | Notes |
|---|---|---|
| 5/8″-18 two-piece swivel flange nut (006-209-00) | 150–175 ft-lbs | Lower than one-piece because less wrench effort is lost to friction — more becomes clamp load |
| 5/8″-18 one-piece flange nut (006-058-00) | 275–325 ft-lbs | For contrast — not the nut for aluminum wheels |
| Absolute max, 5/8″-18 stud | 325 ft-lbs | Beyond risks stud fracture |
- Mounting-face doctrine:both faces (wheel pad, drum flange) clean, bare, dry, flat. No paint, no debris,no lubricant on the faces or threads— the joint works by friction. Anti-seize goes on thepilot ring only, thin film, to prevent aluminum-to-steel galvanic bonding. Stud heads flush; nothing proud on either face.
- Hang the wheel on the pilot with the tire just off the ground— its designed resting position — and snug all nuts (~10 ft-lbs) in a star pattern. (Washer-captured caps install now, under the nuts.)
- Stage up in the star pattern: ~50% → final 150–175.Final torque with the tire on the ground, where the planted wheel resists the wrench.
- Spin/roll check for visible runout; any wheel running out gets backed off, reseated on the pilot, retorqued.
- Re-torque all nuts at 50 miles and again at 100.Aluminum wheels and new studs seat; this is not optional. Check again each towing season. First torque of fresh studs/nuts may feel gritty as manufacturing residue works through — normal; the 50-mile check smooths the story.
The Test Tow
20–30 easy miles, then hand-check every hub face immediately. All corners warm and roughly equal: pass. One corner notably hotter: preload or brake drag — redo the five-minute adjustment before the next trip. An IR thermometer makes it numeric; ~30°F above its siblings is the suspicion threshold (sun side runs naturally warmer).
Tire Pressure by the Table, Not the Sidewall
The single biggest ride-quality lever in the whole conversion — and most people never pull it.
Commercial tires are pressure-rated to load. Weigh your rig loaded (CAT scale ticket: trailer-axle total ÷ 4 positions ≈ per-tire load; add ~10% for side-to-side imbalance) and set cold pressure from the manufacturer’s load/inflation table. The Goodyear G114 215/75R17.5 single-position table:
| Cold PSI | 90 | 95 | 100 | 105 | 110 | 115 | 120 | 125 |
|---|---|---|---|---|---|---|---|---|
| Lbs per tire | 3,695 | 3,860 | 4,020 | 4,180 | 4,340 | 4,495 | 4,650 | 4,805 |
Goodyear’s floor and ceiling: never below 90 psi cold, never above 125. A typical converted rig at ~3,000–3,400 lbs per position is fully rated in the 90–100 psi range — dramatically gentler riding than sidewall-max 125, legitimately and by the book. This build’s rig (12,100 lbs on the trailer axles by scale ticket) runs 95–100 psi with margin. Set pressures cold, first thing in the morning; expect 15–20 psi rise hot — engineered in, so set TPMS alarms off the running pressure, not the cold number. Re-weigh and re-consult after any meaningful load change.
What doesn’t change: axle ratings and GVWR. The tires now out-carry the axles — that’s safety margin, not permission to load heavier.
Balancing: Beads, Not Weights
Mounted 17.5 commercial assemblies still need balancing, and the conversion community’s standard answer is internal balancing beads (glass or ceramic media — Counteract, ABC, and similar) rather than clip-on or stick-on weights:
- Why beads suit this build: they self-distribute dynamically as the wheel spins, continuously re-balancing as tires wear and as loads shift — and they re-balance every trip, where a static weight balance is only correct for the tire condition on the day it was spun. They also leave polished aluminum faces clean (no stick-on packs, no clip marks on the flange), and they’re established commercial-truck practice at exactly this wheel class
- Quantity is size-specific — use the bead manufacturer’s application chart for your tire size (a 215/75R17.5 takes several ounces per tire; the chart, not guesswork, sets the dose). Under-dosing balances poorly; the chart number works
- Install either way: poured into the tire at mounting (easiest — tell the truck tire shop when they mount; they do it daily), or blown/funneled through the valve stem with the core removed on an already-mounted tire
- Valve core detail: bead makers supply or specify filtered valve cores that keep media out of the core seat — use them, or a bead lodging in the core becomes a slow leak that looks like a puncture
- TPMS compatibility check: external cap-style TPMS sensors (the common RV type) coexist with beads fine. Internal band/stem-mounted sensors can conflict — beads pooling against an internal sensor — so match the bead maker’s guidance to your sensor type before pouring
- The spare gets beads too — a bead-balanced spare goes into service balanced, no shop stop required roadside
The Spare Question
Trap #8 — An unmounted commercial tire is not roadside equipment
17.5 commercial tires mount with hydraulic bead breakers, commercial irons, and inflation cages — all-steel beads defeat hand tools, and 125 psi seating has genuine injury history. An unmounted spare’s job is replacement stock: it turns a failed tire into a same-day fix at a truck tire shop (mounted onto the failed tire’s rim) instead of a days-long parts order. Roadside capability requires a mounted spare.
- The economical mounted spare: a steel 17.5. Verified fit: e.g., TrailStar 1756758500MOD (Southwest Wheel) — 17.5×6.75, 8-6.5, 4.75″ bore, hub-piloted, 6,005 lbs, “tighten with 9/16″ or 5/8″ swiveling flange nuts” per its own listing. ~$99–150 bare; also sold pre-mounted with a 16-ply tire as a ready-to-bolt assembly worth pricing against mounting your own
- Same 275mm trap applies double on steel — commercial truck sites sell the semi pattern in identical-looking wheels. Filter by 8×6.5 and 4.75/4.77 bore
- Weight reality: steel rim + commercial tire ≈ 115–120 lbs mounted (vs. ~100 for the forged aluminum version, ~80 for the old 16). Verify the spare carrier’s rating and your extraction plan before the day you need them
- Old 16″ spare after conversion = emergency-crawl only — the inch-plus height mismatch beside a 17.5 on the same axle is the side-to-side case: nearest exit, slow, nothing more
- Roadside kit addition: leverage for 150–175 ft-lbs (breaker bar/torque-capable wrench + correct socket) — no factory lug wrench contemplates these numbers. Plus the spare bearing/race set, spare seal, and a few ounces of matching grease in a sealed container
The Complete Bill of Materials
| Item | Qty | Reference numbers | Street price |
|---|---|---|---|
| Hub/drum kits, 7K, machined pilot, pre-greased | 4 | Dexter K08-219-2G | ≈$710–790 |
| Studs, 5/8″-18 × 2-3/4″, 0.689″ knurl, press-in | 35 | Lippert 175705 / 2024055283 / 2025027415 | ≈$140–180 |
| Two-piece swivel flange nuts, 5/8″-18 | 33 | 006-209-00 / Rockwell 6-209 / 568216 / AME 39946 | ≈$70–190 |
| Spare seals, 2.25″ | 8 | Dexter 010-036-00 | ≈$50–80 |
| Spare bearing/race set (rides in the rig) | 1 | Timken 25580 + 14125A | ≈$40 |
| Grease, lithium-complex NLGI 2 GC-LB | 1 lb tub | e.g., Lucas Red “N” Tacky | ≈$8 |
| Brake parts cleaner | 2 cans | — | ≈$10 |
| Wheels & tires, 17.5 hub-piloted LR-H | 4–5 | 8-6.5 · 4.75–4.77″ bore · flat holes (e.g., Alcoa 661401 + Goodyear G114) | $1,800 used pkg – $4,000+ new |
| Steel 17.5 spare rim (mounted spare) | 1 | e.g., TrailStar 1756758500MOD | ≈$99–150 + mounting |
| Center caps/covers (after bench measurement) | set | Matched to 5/8 hardware | $30–150 |
Hardware and hubs land near $1,100–1,300. The used-takeoff wheel market (disc-conversion sellers) can halve the wheel side, and your factory takeoffs — sold as a complete bolt-on set (wheels, tires, hubs, hardware) after the test tow blesses the new setup, listed with full specs, date codes, and tread photos — recover $1,000+ in many markets. Done patiently, the conversion approaches break-even. Sourcing notes: trailer parts houses (Southwest Wheel, Trailer Parts Unlimited, Brakes 4 Trailers, Eastern Marine) carry everything; local trailer/heavy-truck counters can price-match and enable the bench test — and are worth a small premium for it.
Life After: Ride, Weight, and Care
- Ride firmness: steel sidewalls transmit small sharp inputs more; contents notice before the structure does (expect a few new cabinet rattles, once). The trade-back: less sidewall flex = straighter tracking, less sway, more planted feel. The pressure table (§11) hands most of the harshness back. Structural worry is misplaced — the firmness delta is a fraction of normal road-surface variation, and this conversion has years of community history with zero structural complaints
- Unsprung weight: ~25–40 lbs per corner gained. Largely absorbed by leaf-sprung suspensions; keep wet bolts/equalizer maintenance current so fresh bushings absorb what the stiffer tire passes along. The real cost is your back — mounted assemblies run 100–120 lbs
- Clearance check before the maiden voyage: 17.5s stand taller than 16s — fender skirts and slides at full suspension travel
- Ongoing care: torque check each season and after any wheel-off event; repack bearings every couple seasons (time, not miles, for RV duty); replace tires 5–7 years from date code regardless of tread; clean galvanic bloom off mounting faces at rotations; hand-check hub temps at fuel stops the first few trips
- Document the build: a laminated as-built sheet (axle spec, all part numbers, torque values, “hand-packed — do not use zerks”) in the trailer’s document pouch, plus a label near the certification sticker. It’s for the 2029 tire shop, the mobile tech, and future-you — a rig wearing 8K-class hardware on 7K-stickered axles will confuse someone eventually, and thirty seconds of reading beats wrong parts ordered
The Meta-Lesson
Every trap in this guide was caught the same way: by refusing to accept an unverified number. The pilot came from Dexter’s tech with calipers, not a counter guess. The knurl came from a published spec sheet. The torque came from Dexter’s own bulletin — which corrected a plausible-sounding wrong figure. The stud geometry got corrected when a confident-sounding removal method collided with a pointed question about whether a head can pass through a hole smaller than itself. Sources that sound authoritative — counter staff, forums, spec-quoting AIs — are provisional until checked against the manufacturer, the published sheet, or your own calipers.
When a measurement decides whether $700 of parts fit, get it in writing, and bench-test before the trailer’s on stands. The half-day of phone calls is the cheapest component in the entire build — and the habit outlasts the trailer.
This document describes one owner’s conversion for community reference, with corrections and additions invited — other verified hub brands, wheel sources, and part numbers make this reference better. Wheel-end work is safety-critical: verify every specification against your own axle’s as-built configuration (Dexter: 574-295-7888) and the published documentation for your specific wheels, hubs, and fasteners. Torque and inflation specs cited are the manufacturers’ published figures for the listed part numbers at time of writing — confirm current specs with the documentation packed with your parts. If any step is outside your experience, have a commercial truck tire shop perform or inspect the work.The 17.5″ Conversion · Dexter 7K / #42 Spindle · 2nd EditionRev. July 2026 · Print-friendly · Share freely